 |
||
|
Thanks to Julio Marchi for this space in MSX All |
||
A nice tool to convert PC sounds (samples) to run on MSX PSG. Digitize voices and insert into your app!
On the upper menu bar, click on "File" and "Open". It is also possible to drag and drop files onto the program to open it. 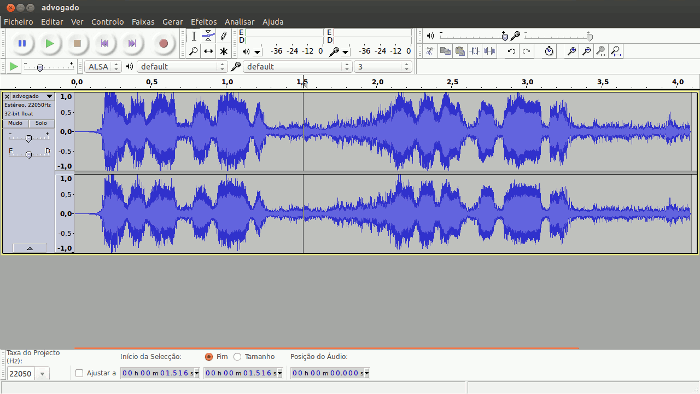 Once the file is open, we can see the whole file wave format. If only one wave graphic is shown, the sound is mono. Otherwise, if there are two wave graphics (as shown in the picture above), the sound is stereo.
Click on "Tracks", "Mix" and "Stereo track to mono". In older Audacities the way is: "Tracks" and "Stereo track to mono". 
For the SND and S4b formats, the MSX DSG is able to divide the file into 16 KB blocks. Nevertheless, the current players can play only 2 blocks at time. Open MSX DSG. On panel "MSX Player", we can calculate the frequency and the maximum time for each 16 KB block, according to the player and the delay. 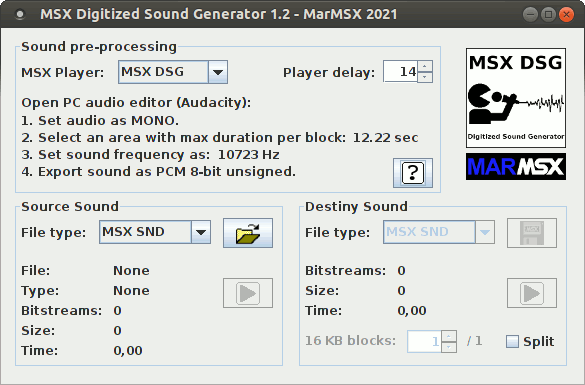 After that tool indicate us the correct frequency and maximum time, we will use both data on sound editor. First, the time tell us the maximum duration of the sound part we want to select. Of course we can select a shorter piece, but if we exceed the time limit, the MSX DSG will cut if we save using 16 KB blocks.
In order to select what we want, we must remove the parts before and after it. Start clicking on the initial part of the desired sound region, as shown by the yellow arrow and the red rectangle on the picture below.  You can drag mouse up to the file beginning. But, press SHIFT + HOME keys to select this region in a easier way.
 After selecting the part to be deleted (marked as dark gray), press DELETE key. This part will be removed.
 After removing the initial part, the resulting file is moved to the beginning.
The next step is to select the end part of our interest sound region, as shown on the figure below.  Select from this part to the end, by pressing SHIFT + END keys.
 Remove this part by pressing DELETE key.
Voila. Our sound part is already selected.  Note: if we want to use two 16 KB blocks, we can select the twice time as indicated on MSX DSG, once this tool is able to divide the file into 16 KB blocks.
As told before, MSX DSG determines what is the correct frequency according to the player and the delay. So, we will do it in Audacity in two steps. The first step is to change the project frequency. At the bottom of Audacity's window, we can see the "Project Rate (Hz)".  Change the value to what MSX DSG shows.
The second step is to resample the sound file. For that, click on "Tracks" and "Resample" on the menu bar. Keep the value shown, which must be the new project frequency. Click on Ok.  The sound file is ready to be exported.
On the save dialog, we have the "file type" (marked with red rectangle) and "options" (marked with green rectangle). 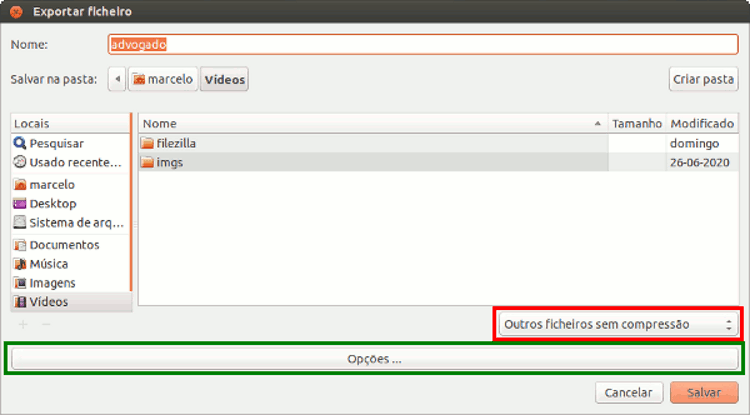 Select the file type "Other uncompressed files". Then, click on "options".
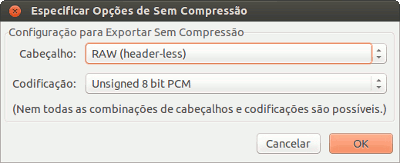 Choose header "RAW (header-less)" and the codification "Unsigned 8-bit PCM".
At last, export the file using these options. Use ".raw" extension.  Choose the option "PC PCM 16-bit" in "File type". Click on load button
  . .After loading, the following informations are shown:
 to save. to save.Note: remember that the sound frequency has alerady been set in Audacity. So, setting the frequency now will NOT change anything in the file. From version 1.1 on, the sound panel was divided into source sound and destiny sound. Thus, the play button  was added to execute both source and destiny sounds. Click this button again to stop sound execution. was added to execute both source and destiny sounds. Click this button again to stop sound execution.For each file type we have the following policies:
The following program in Basic loads the sound data, move to page 0 and runs it. 10 ' SND player MarMSX 2020 20 SCREEN 0:WIDTH40:COLOR 15,0,0:KEY OFF 30 PRINT"MarMSX SND player" 40 PRINT"-----------------" 50 PRINT:PRINT"Loading SND file ... "; 60 BLOAD"file.snd" 70 PRINT"Ok":PRINT"Starting routine to move data ... "; 80 BLOAD"mvdata.bin" 90 DEFUSR=&HD100 100 X=USR(0) 110 PRINT"Ok":PRINT"Sound starts!" 120 BLOAD"snd.bin" 130 DEFUSR=&HD000 140 X=USR(0)The default MarMSX SND player deleay is 14. See on "players settings" section how to change delay. The following program in Basic loads the sound data, move to page 0 and runs it. 10 ' S4b player MarMSX 2020 20 SCREEN 0:WIDTH40:COLOR 15,0,0:KEY OFF 30 PRINT"MarMSX S4b player" 40 PRINT"-----------------" 50 PRINT:PRINT"Loading S4b file ... "; 60 BLOAD"file.s4b" 70 PRINT"Ok":PRINT"Starting routine to move data ... "; 80 BLOAD"mvdata.bin" 90 DEFUSR=&HD100 100 X=USR(0) 110 PRINT"Ok":PRINT"Sound starts!" 120 BLOAD"s4b.bin" 130 DEFUSR=&HD000 140 X=USR(0)The default MarMSX S4b player deleay is 22. See on "players settings" section how to change delay. 85 POKE &H&HD112,&H40This is useful to load two blocks of 16 KB on memory, extending the sound duration. But, we also must change the final address check on the players. Possible changes:
135 POKE &H&HD022,13 Possible changes:
135 POKE &H&HD040,&h80 Possible changes:
References: 1. Audacity. At: https://www.audacityteam.org 2. Manual do Audacity. At https://manual.audacityteam.org |
||


